Chunlei's Blog

刹那是永恒

写在前面的话

有一种语言几乎每个没学过编程的人也都会天天接触,这种语言就是html语言。几乎所以的网页都需要它来写,所以的网站都离不开他,所有的电脑都支持它,所以学一点html不一定是要从事web开发,而是让你对互联网世界有更深层的了解,并在必要的时候读懂和改写代码,让创造性得到施展,让工作和生活更顺畅。
本教程将带你快速浏览网页背后的代码,涉及的内容包括html、CSS、JavaScript、Python、Bootstrap、Jquery、SQL。这些语言和工具足够你开发一个自己的网站和实现想要的功能了。下面,就开始你的探索之旅吧!!

出发前的准备

  • 建议安装一个好用的文本编辑器,用于写代码,比如sublime、Visual Studio Code等,如果不按照用系统自动的文本编辑器也可以,只不过用户体验不会很好。
  • 建议选择一个可多端同步笔记软件,比如印象笔记、Onenote、有道云笔记等,实在不行也可以用纸质笔记本记录自己的学习过程,特别是重要的语句和技术思想,这是你能否学以致用的关键。
  • 安装谷歌或者火狐浏览器,便于对网页进行调试和预览。
  • 测试以下代码的方法,拷贝代码,用编辑器新建文件,粘贴代码,另存为test.html,双击用浏览器打开预览效果,如果对效果不满意,可以对文件重新编辑。
  • 在线测试的方法,点击这个链接,然后把代码粘贴进去,运行即可。

html基本

html是网页注释语言,你可以用它来创建自己的网页。

html文档

1
2
3
4
5
6
7
8
9
10
<!DOCTYPE html>
<html>
<head>
<title>Hello World</title>
</head>
<body>
<h1>这是我的标题</h1>
<p>这是我的段落</p>
</body>
</html>

标题h

1
2
3
4
5
6
7
8
<!DOCTYPE html>
<html>
<body>
<h1>This is heading 1</h1>
<h2>This is heading 2</h2>
<h3>This is heading 3</h3>
</body>
</html>

段落p

1
2
3
4
5
6
7
<!DOCTYPE html>
<html>
<body>
<p>This is a paragraph.</p>
<p>This is another paragraph.</p>
</body>
</html>

超级连接a

1
2
3
4
5
6
7
8
<!DOCTYPE html>
<html>
<body>
<h2>HTML Links</h2>
<p>网页链接用a标记</p>
<a href="zhangchunlei.com">连接</a>
</body>
</html>

图片img

1
2
3
4
5
6
7
8
<!DOCTYPE html>
<html>
<body>
<h2>HTML Images</h2>
<p>HTML images are defined with the img tag:</p>
<img src="https://www.w3schools.com/html/w3schools.jpg" alt="W3Schools.com" width="104" height="142">
</body>
</html>

按钮和JS特效

1
2
3
4
5
6
7
8
9
<!DOCTYPE html>
<html>
<body>
<h2>按钮</h2>
<p>HTML按钮使用关键字button标记:</p>
<p id="demo" style="display:none">这是JS特性!</p>
<button type="button" onclick="document.getElementById('demo').style.display='block'">点我!</button>
</body>
</html>

列表ul和ol

1
2
3
4
5
6
7
8
9
10
11
12
13
14
15
16
17
<!DOCTYPE html>
<html>
<body>
<h2>无序列表</h2>
<ul>
<li>无丝分裂</li>
<li>有丝分裂</li>
<li>减数分裂</li>
</ul>
<h2>有序列表</h2>
<ol>
<li>前期</li>
<li>中期</li>
<li>后期</li>
</ol>
</body>
</html>

样式style

1
2
3
4
5
6
7
8
9
<!DOCTYPE html>
<html>
<body>
<p>I am normal</p>
<p style="color:red;">I am red</p>
<p style="color:blue;">I am blue</p>
<p style="font-size:50px;">I am big</p>
</body>
</html>

文本格式

1
2
3
4
5
6
7
8
<!DOCTYPE html>
<html>
<body>
<p><b>This text is bold</b></p>
<p><i>This text is italic</i></p>
<p>This is<sub> subscript</sub> and <sup>superscript</sup></p>
</body>
</html>

注释

注释虽然并不显示,但是可以帮助阅读和理解代码。

1
2
3
4
5
6
7
8
<!DOCTYPE html>
<html>
<body>
<!-- This is a comment -->
<p>This is a paragraph.</p>
<!-- Comments are not displayed in the browser -->
</body>
</html>

颜色color

1
2
3
4
5
6
7
8
9
10
11
12
13
<!DOCTYPE html>
<html>
<body>
<h1 style="background-color:Tomato;">Tomato</h1>
<h1 style="background-color:Orange;">Orange</h1>
<h1 style="background-color:DodgerBlue;">DodgerBlue</h1>
<h1 style="background-color:MediumSeaGreen;">MediumSeaGreen</h1>
<h1 style="background-color:Gray;">Gray</h1>
<h1 style="background-color:SlateBlue;">SlateBlue</h1>
<h1 style="background-color:Violet;">Violet</h1>
<h1 style="background-color:LightGray;">LightGray</h1>
</body>
</html>

CSS样式

可以使得代码更简洁

1
2
3
4
5
6
7
8
9
10
11
12
13
14
<!DOCTYPE html>
<html>
<head>
<style>
body {background-color: powderblue;}
h1 {color: blue;}
p {color: red;}
</style>
</head>
<body>
<h1>This is a heading</h1>
<p>This is a paragraph.</p>
</body>
</html>

在新窗口打开连接

1
2
3
4
5
6
7
8
<!DOCTYPE html>
<html>
<body>
<h2>The target Attribute</h2>
<a href="https://www.w3schools.com/" target="_blank">Visit W3Schools!</a>
<p>如果target="_blank",网页会在新窗口或便签页打开。</p>
</body>
</html>

图片大小尺寸width&height

1
2
3
4
5
6
7
8
<!DOCTYPE html>
<html>
<body>
<h2>图谱尺寸</h2>
<p>自定义图片长宽</p>
<img src="https://www.w3schools.com/html/img_girl.jpg" alt="Girl in a jacket" width="500" height="600">
</body>
</html>

图片picture

1
2
3
4
5
6
7
8
9
10
11
12
13
14
15
<!DOCTYPE html>
<html>
<head>
<meta name="viewport" content="width=device-width, initial-scale=1.0">
</head>
<body>
<h2>The picture Element</h2>
<picture>
<source media="(min-width: 650px)" srcset="img_food.jpg">
<source media="(min-width: 465px)" srcset="img_car.jpg">
<img src="img_girl.jpg" style="width:auto;">
</picture>
<p>改变浏览器宽度可以自动更换图,部分浏览器版本可能不支持</p>
</body>
</html>

span

1
2
3
4
5
6
7
<!DOCTYPE html>
<html>
<body>
<p>This is an inline span <span style="border: 1px solid; color:black">Hello World</span> element inside a paragraph.</p>
<p>The SPAN element is an inline element, and will not start on a new line and only takes up as much width as necessary.</p>
</body>
</html>

class

1
2
3
4
5
6
7
8
9
10
11
12
13
14
15
<!DOCTYPE html>
<html>
<head>
<style>
.note {
font-size: 120%;
color: red;
}
</style>
</head>
<body>
<h1>My <span class="note">Important</span> Heading</h1>
<p>This is some <span class="note">important</span> text.</p>
</body>
</html>

ID +JS

1
2
3
4
5
6
7
8
9
10
11
12
13
14
<!DOCTYPE html>
<html>
<body>
<h2>用JavaScript调用ID</h2>
<p>JavaScript可以使用getElementById()方法来改变元素内容</p>
<h1 id="myHeader">Hello World!</h1>
<button onclick="displayResult()">Change text</button>
<script>
function displayResult() {
document.getElementById("myHeader").innerHTML = "Have a nice day!";
}
</script>
</body>
</html>

还可以使用JS和getElementById方法改变特定元素的属性。

1
2
3
4
document.getElementById("demo").style.fontSize = "25px";
document.getElementById("demo").style.color = "red";
document.getElementById("demo").style.backgroundColor = "yellow";
document.getElementById("image").src = "picture.gif";

iframe行内框架

1
2
3
4
5
6
7
8
9
<!DOCTYPE html>
<html>
<body>
<h2>制定特定网页在特定位置打开</h2>
<iframe src="" name="iframe_a" height="300px" width="100%" title="Iframe Example"></iframe>
<p><a href="https://www.w3schools.com" target="iframe_a">W3Schools.com</a></p>
<p>当点击链接时,该页面会在制定框架打开</p>
</body>
</html>

file path

1
2
3
4
5
<img src="picture.jpg"> 文件在网页相同目录(当前目录)#相对路径
<img src="images/picture.jpg"> 文件在当前目录下的images文件夹中
<img src="/images/picture.jpg"> 文件中根目录下的images文件夹中
<img src="../picture.jpg"> 文件中当前目录上一层文件夹中
<img src="https://www.w3schools.com/images/picture.jpg"> #绝对路径

head是一个包含下列元素title, style, meta, link, script,base的容器。 它位于html和body标记之间。例如:

1
2
3
4
5
6
7
8
9
10
11
12
13
14
15
16
17
18
19
20
21
<!DOCTYPE html>
<html>
<head>
<title>Page Title</title>
<meta charset="UTF-8">
<meta name="description" content="Free Web tutorials">
<meta name="keywords" content="HTML, CSS, JavaScript">
<meta name="author" content="John Doe">
<meta name="viewport" content="width=device-width, initial-scale=1.0">
<link rel="stylesheet" href="mystyle.css">
<base href="https://www.w3schools.com/" target="_blank">
<script>
function myFunction() {
document.getElementById("demo").innerHTML = "Hello JavaScript!";
}
</script>
</head>
<body>
<p>All meta information goes inside the head section.</p>
</body>
</html>

canvas

1
2
3
4
5
6
7
8
9
10
11
12
13
14
15
16
17
18
19
20
21
22
23
24
25
26
27
28
29
30
31
32
33
34
35
36
37
38
39
40
41
42
43
44
45
46
47
48
49
<!DOCTYPE html>
<html>
<body>
<canvas id="myCanvas" width="200" height="100" style="border:1px solid #d3d3d3;">
Your browser does not support the HTML canvas tag.</canvas>
//line
<script>
var c = document.getElementById("myCanvas");
var ctx = c.getContext("2d");
ctx.moveTo(0,0);
ctx.lineTo(200,100);
ctx.stroke();
</script>
//circle
<script>
var c = document.getElementById("myCanvas");
var ctx = c.getContext("2d");
ctx.beginPath();
ctx.arc(95, 50, 40, 0, 2 * Math.PI);
ctx.stroke();
</script>
//hello world 1
<script>
var c = document.getElementById("myCanvas");
var ctx = c.getContext("2d");
ctx.font = "30px Arial";
ctx.fillText("Hello World", 10, 50);
</script>
//hello world 2
<script>
var c = document.getElementById("myCanvas");
var ctx = c.getContext("2d");
ctx.font = "30px Arial";
ctx.strokeText("Hello World", 10, 50);
</script>
// gradient
<script>
var c = document.getElementById("myCanvas");
var ctx = c.getContext("2d");
// Create gradient
var grd = ctx.createLinearGradient(0, 0, 200, 0);
grd.addColorStop(0, "red");
grd.addColorStop(1, "white");
// Fill with gradient
ctx.fillStyle = grd;
ctx.fillRect(10, 10, 150, 80);
</script>
</body>
</html>

绘制图片

1
2
3
4
5
6
7
8
9
10
11
12
13
14
15
16
17
18
19
20
<!DOCTYPE html>
<html>
<body>
<p>Image to use:</p>
<img id="scream" src="img_the_scream.jpg" alt="The Scream" width="220" height="277">
<p>Canvas to fill:</p>
<canvas id="myCanvas" width="250" height="300"
style="border:1px solid #d3d3d3;">
Your browser does not support the HTML canvas tag.</canvas>
<p><button onclick="myCanvas()">Try it</button></p>
<script>
function myCanvas() {
var c = document.getElementById("myCanvas");
var ctx = c.getContext("2d");
var img = document.getElementById("scream");
ctx.drawImage(img,10,10);
}
</script>
</body>
</html>

CSS

CSS是定义网页显示风格的语言。

什么是CSS?

CSS是Cascading Style Sheets的缩写
CSS描述了HTML元素如何在屏幕或者其他媒体中现实的样式。
CSS能节省大量的工作。它能够轻松定制多个网页。
外部风格定义表单存储在CSS文件中。我们只需要一个CSS文件,就可以管控所以网页。

CSS插入的3种方式

  • 外部CSS文件
  • 在网页head容器内插入CSS
  • 在元素内插入CSS

外部CSS文件

1
<link rel="stylesheet" href="mystyle.css">

网页内嵌风格

1
2
3
4
5
6
7
8
9
10
11
12
13
14
15
16
17
18
19
20
21
22
23
24
25
26
27
28
29
30
31
32
33
34
<!DOCTYPE html>
<html>
<head>
<style>
body {
background-color: lightblue;
}
h1 {
color: white;
text-align: center;
}
p {
font-family: verdana;
font-size: 20px;
color: red;
text-align: center;
}
p.center {
text-align: center;
color: red;
}
.center {
text-align: center;
color: red;
}
</style>
</head>
<body>
<h1>My First CSS Example</h1>
<p>This is a paragraph.</p>
<h1 class="center">Red and center-aligned heading</h1>
<p class="center">Red and center-aligned paragraph.</p>
</body>
</html>

行内插入CSS

1
2
3
4
5
6
7
<!DOCTYPE html>
<html>
<body>
<h1 style="color:blue;text-align:center;">This is a heading</h1>
<p style="color:red;">This is a paragraph.</p>
</body>
</html>

JavaScript

改变元素内容

1
2
3
4
5
6
7
8
9
10
11
12
<!DOCTYPE html>
<html>
<body>

<h2>What Can JavaScript Do?</h2>

<p id="demo">JavaScript can change HTML content.</p>

<button type="button" onclick='document.getElementById("demo").innerHTML = "Hello JavaScript!"'>Click Me!</button>

</body>
</html>

改变元素属性值

1
2
3
4
5
6
7
8
9
10
11
<!DOCTYPE html>
<html>
<body>
<h2>What Can JavaScript Do?</h2>
<p>JavaScript can change HTML attribute values.</p>
<p>In this case JavaScript changes the value of the src (source) attribute of an image.</p>
<button onclick="document.getElementById('myImage').src='https://www.w3schools.com/js/pic_bulbon.gif'">Turn on the light</button>
<img id="myImage" src="pic_bulboff.gif" style="width:100px">
<button onclick="document.getElementById('myImage').src='https://www.w3schools.com/js/pic_bulboff.gif'">Turn off the light</button>
</body>
</html>

对象object

1
2
3
4
5
6
7
8
9
10
11
12
13
14
15
16
17
18
19
20
<!DOCTYPE html>
<html>
<body>
<h2>JavaScript Objects</h2>
<p>There are two different ways to access an object property.</p>
<p>You can use person.property or person["property"].</p>
<p id="demo"></p>
<script>
// Create an object:
const person = {
firstName: "John",
lastName : "Doe",
id : 5566
};
// Display some data from the object:
document.getElementById("demo").innerHTML =
person.firstName + " " + person.lastName;
</script>
</body>
</html>

事件events

1
2
3
4
5
6
7
<!DOCTYPE html>
<html>
<body>
<button onclick="document.getElementById('demo').innerHTML=Date()">The time is?</button>
<p id="demo"></p>
</body>
</html>

函数调用

1
2
3
4
5
6
7
8
9
10
11
12
13
14
<!DOCTYPE html>
<html>
<body>
<h2>JavaScript Math.random()</h2>
<p>Math.random() returns a random number between 0 and 1:</p>
<button type="button" onclick='myFunction()'>Click Me!</button>
<p id="demo"></p>
<script>
function myFunction() {
document.getElementById("demo").innerHTML = Math.random();
}
</script>
</body>
</html>

数据类型

1
2
3
let length = 16;                               // Number
let lastName = "Johnson"; // String
let x = {firstName:"John", lastName:"Doe"}; // Object

应遵循的良好习惯

best practice you should follow

代码示例

博客网站layout样例

1
2
3
4
5
6
7
8
9
10
11
12
13
14
15
16
17
18
19
20
21
22
23
24
25
26
27
28
29
30
31
32
33
34
35
36
37
38
39
40
41
42
43
44
45
46
47
48
49
50
51
52
53
54
55
56
57
58
59
60
61
62
63
64
65
66
67
68
69
70
71
72
73
74
75
76
77
78
79
80
81
82
83
84
85
86
87
88
89
90
91
92
93
94
95
96
97
98
99
100
101
102
103
104
105
106
107
108
109
110
111
112
113
114
115
116
117
118
119
120
121
122
123
124
125
126
127
128
129
130
131
132
133
134
135
136
137
138
139
140
141
142
143
144
145
146
147
148
149
150
151
152
153
154
155
156
157
158
159
160
161
162
163
164
<!DOCTYPE html>
<html>
<head>
<style>
* {
box-sizing: border-box;
}

body {
font-family: Arial;
padding: 10px;
background: #f1f1f1;
}

/* Header/Blog Title */
.header {
padding: 30px;
text-align: center;
background: white;
}

.header h1 {
font-size: 50px;
}

/* Style the top navigation bar */
.topnav {
overflow: hidden;
background-color: #333;
}

/* Style the topnav links */
.topnav a {
float: left;
display: block;
color: #f2f2f2;
text-align: center;
padding: 14px 16px;
text-decoration: none;
}

/* Change color on hover */
.topnav a:hover {
background-color: #ddd;
color: black;
}

/* Create two unequal columns that floats next to each other */
/* Left column */
.leftcolumn {
float: left;
width: 75%;
}

/* Right column */
.rightcolumn {
float: left;
width: 25%;
background-color: #f1f1f1;
padding-left: 20px;
}

/* Fake image */
.fakeimg {
background-color: #aaa;
width: 100%;
padding: 20px;
}

/* Add a card effect for articles */
.card {
background-color: white;
padding: 20px;
margin-top: 20px;
}

/* Clear floats after the columns */
.row:after {
content: "";
display: table;
clear: both;
}

/* Footer */
.footer {
padding: 20px;
text-align: center;
background: #ddd;
margin-top: 20px;
}

/* Responsive layout - when the screen is less than 800px wide, make the two columns stack on top of each other instead of next to each other */
@media screen and (max-width: 800px) {
.leftcolumn, .rightcolumn {
width: 100%;
padding: 0;
}
}

/* Responsive layout - when the screen is less than 400px wide, make the navigation links stack on top of each other instead of next to each other */
@media screen and (max-width: 400px) {
.topnav a {
float: none;
width: 100%;
}
}
</style>
</head>
<body>

<div class="header">
<h1>My Website</h1>
<p>Resize the browser window to see the effect.</p>
</div>

<div class="topnav">
<a href="#">Link</a>
<a href="#" style="float:right">Link</a>
</div>

<div class="row">
<div class="leftcolumn">
<div class="card">
<h2>TITLE HEADING</h2>
<h5>Title description, Dec 7, 2017</h5>
<div class="fakeimg" style="height:200px;">Image</div>
<p>Some text..</p>
<p>Sunt in culpa qui officia deserunt mollit anim id est laborum consectetur adipiscing elit, sed do eiusmod tempor incididunt ut labore et dolore magna aliqua. Ut enim ad minim veniam, quis nostrud exercitation ullamco.</p>
</div>
<div class="card">
<h2>TITLE HEADING</h2>
<h5>Title description, Sep 2, 2017</h5>
<div class="fakeimg" style="height:200px;">Image</div>
<p>Some text..</p>
<p>Sunt in culpa qui officia deserunt mollit anim id est laborum consectetur adipiscing elit, sed do eiusmod tempor incididunt ut labore et dolore magna aliqua. Ut enim ad minim veniam, quis nostrud exercitation ullamco.</p>
</div>
</div>
<div class="rightcolumn">
<div class="card">
<h2>About Me</h2>
<div class="fakeimg" style="height:100px;">Image</div>
<p>Some text about me in culpa qui officia deserunt mollit anim..</p>
</div>
<div class="card">
<h3>Popular Post</h3>
<div class="fakeimg"><p>Image</p></div>
</div>
<div class="card">
<h3>Follow Me</h3>
<p>Some text..</p>
</div>
</div>
</div>

<div class="footer">
<h2>Footer</h2>
</div>

</body>
</html>

钟表代码

1
2
3
4
5
6
7
8
9
10
11
12
13
14
15
16
17
18
19
20
21
22
23
24
25
26
27
28
29
30
31
32
33
34
35
36
37
38
39
40
41
42
43
44
45
46
47
48
49
50
51
52
53
54
55
56
57
58
59
60
61
62
63
64
65
66
67
68
69
70
71
72
73
74
75
76
77
78
79
80
81
82
83
84
85
<!DOCTYPE html>
<html>
<body>
<canvas id="canvas" width="400" height="400"
style="background-color:#333">
</canvas>
<script>
var canvas = document.getElementById("canvas");
var ctx = canvas.getContext("2d");
var radius = canvas.height / 2;
ctx.translate(radius, radius);
radius = radius * 0.90
setInterval(drawClock, 1000);
//define functions
function drawClock() {
drawFace(ctx, radius);
drawNumbers(ctx, radius);
drawTime(ctx, radius);
}
function drawFace(ctx, radius) {
var grad;
ctx.beginPath();
ctx.arc(0, 0, radius, 0, 2*Math.PI);
ctx.fillStyle = 'white';
ctx.fill();
grad = ctx.createRadialGradient(0,0,radius*0.95, 0,0,radius*1.05);
grad.addColorStop(0, '#333');
grad.addColorStop(0.5, 'white');
grad.addColorStop(1, '#333');
ctx.strokeStyle = grad;
ctx.lineWidth = radius*0.1;
ctx.stroke();
ctx.beginPath();
ctx.arc(0, 0, radius*0.1, 0, 2*Math.PI);
ctx.fillStyle = '#333';
ctx.fill();
}
function drawNumbers(ctx, radius) {
var ang;
var num;
ctx.font = radius*0.15 + "px arial";
ctx.textBaseline="middle";
ctx.textAlign="center";
for(num = 1; num < 13; num++){
ang = num * Math.PI / 6;
ctx.rotate(ang);
ctx.translate(0, -radius*0.85);
ctx.rotate(-ang);
ctx.fillText(num.toString(), 0, 0);
ctx.rotate(ang);
ctx.translate(0, radius*0.85);
ctx.rotate(-ang);
}
}
function drawTime(ctx, radius){
var now = new Date();
var hour = now.getHours();
var minute = now.getMinutes();
var second = now.getSeconds();
//hour
hour=hour%12;
hour=(hour*Math.PI/6)+
(minute*Math.PI/(6*60))+
(second*Math.PI/(360*60));
drawHand(ctx, hour, radius*0.5, radius*0.07);
//minute
minute=(minute*Math.PI/30)+(second*Math.PI/(30*60));
drawHand(ctx, minute, radius*0.8, radius*0.07);
// second
second=(second*Math.PI/30);
drawHand(ctx, second, radius*0.9, radius*0.02);
}
function drawHand(ctx, pos, length, width) {
ctx.beginPath();
ctx.lineWidth = width;
ctx.lineCap = "round";
ctx.moveTo(0,0);
ctx.rotate(pos);
ctx.lineTo(0, -length);
ctx.stroke();
ctx.rotate(-pos);
}
</script>
</body>
</html>

web game实例

1
2
3
4
5
6
7
8
9
10
11
12
13
14
15
16
17
18
19
20
21
22
23
24
25
26
27
28
29
30
31
32
33
34
35
36
37
38
39
40
41
42
43
44
45
46
47
48
49
50
51
52
53
54
55
56
57
58
59
60
61
62
63
64
65
66
67
68
69
70
71
72
73
74
75
76
77
78
79
80
81
82
83
84
85
86
87
88
89
90
91
92
93
94
95
96
97
98
99
100
101
102
103
104
105
106
107
108
109
110
111
112
113
114
115
116
117
118
119
120
121
122
123
124
125
126
127
128
129
130
131
132
133
134
135
136
137
138
139
140
141
142
143
144
145
146
147
148
149
150
151
152
153
154
155
156
157
158
159
160
161
162
163
164
165
<!DOCTYPE html>
<html>
<head>
<meta name="viewport" content="width=device-width, initial-scale=1.0"/>
<style>
canvas {
border:1px solid #d3d3d3;
background-color: #f1f1f1;
}
</style>
</head>
<body onload="startGame()">
<script>
var myGamePiece;
var myObstacles = [];
var myScore;

function startGame() {
myGamePiece = new component(20, 20, "red", 10, 120);
myGamePiece.gravity = 0.5;
myScore = new component("30px", "Consolas", "black", 280, 40, "text");
myGameArea.start();
}

function myrefresh(){
window.location.reload();
}

var myGameArea = {
canvas : document.createElement("canvas"),
start : function() {
this.canvas.width = 480;
this.canvas.height = 270;
this.context = this.canvas.getContext("2d");
document.body.insertBefore(this.canvas, document.body.childNodes[0]);
this.frameNo = 0;
this.interval = setInterval(updateGameArea, 20);
},
clear : function() {
this.context.clearRect(0, 0, this.canvas.width, this.canvas.height);
}
}

function component(width, height, color, x, y, type) {
this.type = type;
this.score = 0;
this.width = width;
this.height = height;
this.speedX = 0;
this.speedY = 0;
this.x = x;
this.y = y;
this.gravity = 0;
this.gravitySpeed = 0;
this.update = function() {
ctx = myGameArea.context;
if (this.type == "text") {
ctx.font = this.width + " " + this.height;
ctx.fillStyle = color;
ctx.fillText(this.text, this.x, this.y);
} else {
ctx.fillStyle = color;
ctx.fillRect(this.x, this.y, this.width, this.height);
}
}
this.newPos = function() {
this.gravitySpeed = this.gravity;
this.x += this.speedX;
this.y += this.speedY + this.gravitySpeed;
this.hitBottom();
}
this.hitBottom = function() {
var rockbottom = myGameArea.canvas.height - this.height;
if (this.y > rockbottom) {
this.y = rockbottom;
this.gravitySpeed = 0;
}
}
this.crashWith = function(otherobj) {
var myleft = this.x;
var myright = this.x + (this.width);
var mytop = this.y;
var mybottom = this.y + (this.height);
var otherleft = otherobj.x;
var otherright = otherobj.x + (otherobj.width);
var othertop = otherobj.y;
var otherbottom = otherobj.y + (otherobj.height);
var crash = true;
if ((mybottom < othertop) || (mytop > otherbottom) || (myright < otherleft) || (myleft > otherright)) {
crash = false;
}
return crash;
}
//event listener
document.addEventListener("keydown",keyDownHandler, false);
document.addEventListener("keyup",keyUpHandler, false);
}

function updateGameArea() {
var x, height, gap, minHeight, maxHeight, minGap, maxGap;
for (i = 0; i < myObstacles.length; i += 1) {
if (myGamePiece.crashWith(myObstacles[i])) {
return;
}
}
myGameArea.clear();
myGameArea.frameNo += 1;
if (myGameArea.frameNo == 1 || everyinterval(150)) {
x = myGameArea.canvas.width;
minHeight = 20;
maxHeight = 200;
height = Math.floor(Math.random()*(maxHeight-minHeight+1)+minHeight);
minGap = 50;
maxGap = 200;
gap = Math.floor(Math.random()*(maxGap-minGap+1)+minGap);
myObstacles.push(new component(10, height, "green", x, 0));
myObstacles.push(new component(10, x - height - gap, "green", x, height + gap));
}
for (i = 0; i < myObstacles.length; i += 1) {
myObstacles[i].x += -1;
myObstacles[i].update();
}
myScore.text="SCORE: " + myGameArea.frameNo;
myScore.update();
myGamePiece.newPos();
myGamePiece.update();
}

function everyinterval(n) {
if ((myGameArea.frameNo / n) % 1 == 0) {return true;}
return false;
}

function accelerate(n) {
myGamePiece.gravity = n;
}

//------------
//Key Handlers
//------------
function keyDownHandler(event)
{
var keyPressed = String.fromCharCode(event.keyCode);
if ((keyPressed == "W") || (keyPressed == "&"))
{
accelerate(-1.5);
}
}
function keyUpHandler(event)
{
var keyPressed = String.fromCharCode(event.keyCode);
if ((keyPressed == "W") || (keyPressed == "&") )
{
accelerate(1);
}
}
</script>

<br>
<button onmousedown="accelerate(-0.2)" onmouseup="accelerate(0.05)">ACCELERATE</button>
<button onclick="myrefresh()">Restart</button>
<p>使用上下方向键控制</p>
<p>看你能坚持多久?</p>
</body>
</html>

自己写一个主页index.html,替代原有的padlet,原有是padlet间歇性无法访问。但是发现提交到服务器没有反应。

问题是网站使用的是python django框架,每次更新页面需要重启python manage.py。重启的办法是首先要找到并关闭该进程,然后再重新开启。

###找到服务进程、kill并重启

1
2
3
netstat -tnlp #查看端口
kill 18283 # 关闭python所在进程
nohup python manage.py runserver 0.0.0.0:3000 #重新开启

这时本地服务就开启了,但是还需要开启反向代理才能访问。注意,这一步需要新建一个端口,否则会导致刚开启的3000服务终止。

1
/bin/systemctl restart nginx.service

服务器上让代码生效

至于上传代码,则可以依靠强大的github来完成,其原理是更新本地代码,然后推送到github,然后登录服务器pull远程代码到本地,这样就实现了代码上传服务器。

1
2
3
cd /var/djangoweb/ictweb/
git status
git pull

其实也快成自己上传代码到服务器,只不过不便于多人协作管理。

###遇到的问题:
图片无法正常显示,需要使用static/images/logo.png这样的相对路径。

git合并冲突,需要先手动解决冲突,然后commit,之后就正常了。可以参考这里

下面是使用neo4j构建知识图谱的简明教程,通过一番折腾发现,学习使用一个工具最快的方法不是看文档,而是看视频,然后实操,并记录。

neo4j功能简介

neo4j是一个图形数据关联软件。

可以使用它来构建和维护知识图谱。

知识图谱是智能教育的基础,它是学习者画像、智能推荐、学习分析、智慧内容以及智能导师的前提。

本案例尝试使用三元组构建图谱,所谓三元组是:节点1-连接-节点2。

首先导入csv需要将文件放置在import文件夹中,从neo4j面板可以打开这个文件夹。

每次修改这个文件夹,可能需要重启neo4j,否则可能无法加载。另外确保文件名一致。

常用命令

清空已有节点和关系
MATCH (n) DETACH DELETE n

导入CSV文件

1
2
3
4
5
6
7
8
9
LOAD CSV WITH HEADERS FROM "file:///node1.csv" AS line
MERGE (z:概念1{name:line.node1})

LOAD CSV WITH HEADERS FROM "file:///node2.csv" AS line
MERGE (z:概念2{name:line.node2})

LOAD CSV WITH HEADERS FROM "file:///tup.csv" AS line
match (from:概念1{name:line.node1}),(to:概念2{name:line.node2})
merge (from)-[r:关联{name:line.link}]->(to)

导入并创建节点和关系

1
2
3
4
LOAD CSV FROM 'file:///tup.csv' AS line CREATE (:Map { linkID: line[0], nod1: line[1], link: line[2], nod2:line[3] });

LOAD CSV FROM 'file:///tup.csv' AS line
CREATE (line[1])-[r:line[2]]->(line[3]);

显示所有关系

1
2
3
4
5
MATCH (n) RETURN (n)

MATCH (n:概念1{name:"细胞"}) RETURN n

MATCH (n:概念1{name:"细胞"})-[]-() RETURN n

利用apoc创建三元图

apoc是一个插件,需要先安装,然后才能调用。

创建概念1节点

1
2
3
LOAD CSV WITH HEADERS FROM "file:///node1.csv" AS line
call apoc.create.node(["Concept1",line.node1],{name:line.node1}) yield node
return node

创建概念2节点

1
2
3
LOAD CSV WITH HEADERS FROM "file:///node2.csv" AS line
call apoc.create.node(["Concept2",line.node2],{name:line.node2}) yield node
return node

创建关联

1
2
3
4
LOAD CSV WITH HEADERS FROM "file:///tup.csv" AS line
match (c1:Concept1{name:line.node1}),(c2:Concept2{name:line.node2})
call apoc.create.relationship(c1,line.link,line{.type},c2) yield rel
return rel

清除重复节点和关系

1
2
3
4
5
6
7
8
9
10
11
12
13
14
15
16
17
MATCH (n:Tag)
WITH n.name AS name, COLLECT(n) AS nodelist, COUNT(*) AS count
WHERE count > 1
CALL apoc.refactor.mergeNodes(nodelist) YIELD node
RETURN node

MATCH (n:Concept2)
WITH n.name AS name, COLLECT(n) AS nodelist, COUNT(*) AS count
WHERE count > 1
CALL apoc.refactor.mergeNodes(nodelist) YIELD node
RETURN node

MATCH (a:Concept1)-[r]-(b:Concept2)
WITH a, b, collect(r) as rels
CALL apoc.refactor.mergeRelationships(rels,{properties:"combine"})
YIELD rel
RETURN count(rel)

路径查询命令

1
2
3
4
5
6
7
8
9
10
11
12
13
14
15
16
17
18
19
20
21
22
23
24
25
26
# 两节点之间的所有路径
MATCH p=(a)-[*]->(b)
RETURN p
# a->b 直接连接
MATCH p=(a)-[]->(b)
RETURN p

MATCH p=(:Concept1{name:"细胞"})-[]->(:Concept2{name:"蛋白质"})
RETURN p

# a-...>b a、b之间有三个关系及两个节点
# 等价于 (a) - () - () -> (b)
MATCH p=(a)-[*3]->(b)
RETURN p

# 路径包含2个以上关系
MATCH p=(a)-[*2..]->(b)
RETURN p

# 路径包含6个以内关系
MATCH p=(a)-[*..6]->(b)
RETURN p

# 路径包含3~5个关系
MATCH p=(a)-[*3..5]->(b)
RETURN p

通过三元组csv数据表创建概念网络

这个工作用cmap或者node4j都可以做,cmap适合简单的制图,node4j更适合在服务器端构建知识图谱。下面介绍一下如何通过node4j和一个数据表来生成图库。

部分csv数据表结构如下

hc link tc role
细胞 包含 细胞膜
细胞 包含 细胞质
细胞 多包含 细胞核
细胞 包含 三分之二

其中hc表示head Concept,tc表示tail concept, link是连续词,role是补充说明。

添加节点

1
2
3
4
5
6
7
LOAD CSV WITH HEADERS FROM "file:///relation.csv" AS line
call apoc.create.node(["Concept",line.hc],{name:line.hc}) yield node
return node

LOAD CSV WITH HEADERS FROM "file:///relation.csv" AS line
call apoc.create.node(["Concept",line.tc],{name:line.tc}) yield node
return node

去除重复节点

1
2
3
4
5
MATCH (n:Concept)
WITH n.name AS name, COLLECT(n) AS nodelist, COUNT(*) AS count
WHERE count > 1
CALL apoc.refactor.mergeNodes(nodelist) YIELD node
RETURN node

添加链接

1
2
3
4
LOAD CSV WITH HEADERS FROM "file:///relation.csv" AS line
match (c1:Concept{name:line.hc}),(c2:Concept{name:line.tc})
call apoc.create.relationship(c1,line.link,line{.role},c2) yield rel
return rel

查看效果

1
2
3
4
5
6
7
MATCH p=()-->() RETURN p LIMIT 100

MATCH p=(:Concept{name:"细胞"})-[]->(:Concept{name:"蛋白质"})
RETURN p

MATCH p=(:Concept{name:"细胞"})-[*]->(:Concept{name:"蛋白质"})
RETURN p

显示结果如下:
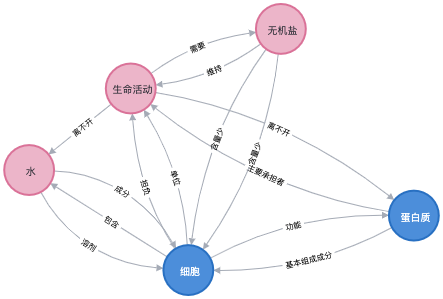
map show all the linke between conception cell and protein

修改和完善图谱

增加节点

1
2
3
CREATE (n:Person {name:'John'}) RETURN n

CREATE (n:Concept {name:'细胞呼吸'}) RETURN n

增加链接

1
2
3
4
5
6
7
8
9
10
11
12
13
14
MATCH (a:Person {name:'Liz'}),
(b:Person {name:'Mike'})
MERGE (a)-[:FRIENDS]->(b)

MATCH (a:Concept {name:'光合作用'}),
(b:Concept {name:'光反应'})
MERGE (a)-[:包含]->(b)

MATCH (a:Concept {name:'光合作用'}),
(b:Concept {name:'暗反应'})
MERGE (a)-[:包含]->(b)

MATCH p=(:Concept{name:"光合作用"})-[*..3]->()
RETURN p LIMIT 100

数据库操作

备份数据库

如果你对数据库进行了修改,想保留一个备份以备今后使用,那么可以使用neo4j-admin dump命令。

首先先停止服务,然后在shell环境下,运行:

1
bin/neo4j-admin dump --database=neo4j --to=/dumps/neo4j/neo4j-<timestamp>.dump

具体可以参考官方文档

加载数据库

你还可以使用neo4j-admin load命令加载一个数据库。如果是替换一个已有数据库,你需要先将其停止运行。

1
bin/neo4j-admin load --from=/dumps/neo4j/neo4j-<timestamp>.dump --database=neo4j --force

复制数据库

使用neo4j-admin copy复制或者选择性复制

1
2
3
4
5
6
7
8
9
STOP DATABASE neo4j

bin/neo4j-admin copy --from-database=neo4j --to-database=copy

ls -al ../data/databases

CREATE DATABASE copy

SHOW DATABASES

还可以筛选数据,下面的命令就是删除cat,dog标签的节点

1
bin/neo4j-admin copy --from-database=neo4j --to-database=copy --delete-nodes-with-labels="Cat,Dog"

参考官方文档

GWD下载页面,这样写道:Create engaging, interactive HTML5-based designs and motion graphics that can run on any device.

这是GWD对自己的定位,而我接触GWD则是因为再寻找一个替代animate动画制作软件。居然真的被我找到了。GWD应该说是一个不错的替代品。第一它是免费的,第二它是谷歌出品的,第三它支持脚本交互。此外,它符合个人的开发思维习惯。

除了用它可以实现基本动画之外,还可以用它开发小游戏,比如:https://html5advertising.de/2015/09/game-development-with-google-web-designer-ninja-jump-part-i/

视频教程:https://www.youtube.com/watch?v=BPa9Z_t-Wxo

此外,Patrick Voelcker还提供了一个作弊清单如下:

Google Web Designer API Cheatsheet

Change Content:

1
2
3
4
5
6
7
8
9
10
11
12
13
14
15
16
17
Textfield:
gwd.actions.events.getElementById(textFieldId:String).​textContent​= content:String;

Image:
gwd.actions.events.getElementById(imageId:String).​setAttribute(​"source", imageUrl:String);

Video Player:
gwd.actions.events.getElementById(videoId:String).s​etAttribute(​"sources", videoUrls:String);

YouTube Player:
gwd.actions.gwdYoutube.​setYouTubeId​(ytPlayerId:String, ytId:String, cueOnly:Boolean);

Exit:
gwd.actions.events.getElementById(tapAreaId:String).​setAttribute​("data­exit­url", url:String);

CSS:
gwd.actions.events.s​etInlineStyle(​objectId:String, cssCode:String);

Timeline

1
2
3
gwd.actions.timeline.​play​(objectId:String);
gwd.actions.timeline.​pause​(objectId:String);
gwd.actions.timeline.​togglePlay​(objectId:String); gwd.actions.timeline.​gotoAndPlay​(objectId:String, labelName:String); gwd.actions.timeline.​gotoAndPause​(objectId:String, labelName:String);

Page Deck

1
gwd.actions.gwdPagedeck.​goToPage(​'gwd­ad', pageId:String, transitionStyle:String, duration:Number, transitionTiming:String, direction:String)

TaP Aera

1
gwd.actions.events.getElementById(tapAreaId:String).​setAttribute(​"data­exit­url", url:String) gwd.actions.gwdIframe.​setUrl​(iframeId:String, url:String)
1
2
3
4
5
6
7
8
gwd.actions.gwdDoubleclick.​initAd​('gwd­ad');
gwd.actions.gwdDoubleclick.​goToPage​('gwd­ad', pageId:String, transitionStyle:String, duration:Number,
transitionTiming:String, direction:String); gwd.actions.gwdDoubleclick.​exit​('gwd­ad', exitName:String, url:String, collapse:Boolean, pauseMedia:Boolean);
gwd.actions.gwdDoubleclick.​exitOverride​('gwd­ad', exitName:String, url:String, collapse:Boolean, pauseMedia:Boolean);
gwd.actions.gwdDoubleclick.​incrementCounter​('gwd­ad', counterName:String, isCumulative:Boolean);
gwd.actions.gwdDoubleclick.​startTimer​('gwd­ad', timerName:String);
gwd.actions.gwdDoubleclick.​stopTimer​('gwd­ad', timerName:String);
gwd.actions.gwdDoubleclick.​reportManualClose​('gwd­ad‘);
1
2
3
4
5
gwd.actions.gwdSwipegallery.​goToFrame​(galleryId:String, frameNumber:Number, transitionStyle:String);
gwd.actions.gwdSwipegallery.​goForwards​(galleryId:String);
gwd.actions.gwdSwipegallery.​goBackwards​(galleryId:String);
gwd.actions.gwdSwipegallery.​rotateOnce​(galleryId:String, duration:Number, direction:String);
gwd.actions.gwdSwipegallery.​stopRotation​(galleryId:String);
1
2
3
4
5
gwd.actions.gwdCarouselgallery.​goToFrame​(galleryId:String, frameNumber:Number, transitionStyle:String);
gwd.actions.gwdCarouselgallery.​goForwards​(galleryId:String);
gwd.actions.gwdCarouselgallery.​goBackwards​(galleryId:String);
gwd.actions.gwdCarouselgallery.​rotateOnce​(galleryId:String, duration:Number, direction:String);
gwd.actions.gwdCarouselgallery.​stopRotation​(galleryId:String);
1
2
3
4
gwd.actions.gwd360gallery.​goToFrame​(galleryId:String, frameNumber:Number, transitionStyle:String, direction:String);
gwd.actions.gwd360gallery.​goForwards​(galleryId:String);
gwd.actions.gwd360gallery.​goBackwards​(galleryId:String);
gwd.actions.gwd360gallery.​rotateOnce​(galleryId:String, duration:Number, direction:String);

Audio Player

1
2
3
4
5
gwd.actions.gwdAudio.​play​(audioPlayerId:String);
gwd.actions.gwdAudio.​pause​(audioPlayerId:String);
gwd.actions.gwdAudio.​mute​(audioPlayerId:String);
gwd.actions.gwdAudio.​replay​(audioPlayerId:String);
gwd.actions.gwdAudio.​seek​(audioPlayerId:String, time:Number);

Video Player

1
2
3
4
5
gwd.actions.gwdVideo.​play​(videoPlayerId:String);
gwd.actions.gwdVideo.​pause​(videoPlayerId:String);
gwd.actions.gwdVideo.​mute​(videoPlayerId:String);
gwd.actions.gwdVideo.​replay​(videoPlayerId:String);
gwd.actions.gwdVideo.​seek​(videoPlayerId:String, time:Number);

从整个开发流程上,GWD与早期的Flash是否相似,便于快速上手。只不过有缺憾的是,中文教程几乎没有,需要自己试水。

作为动画制作软件,我最先接触的是Flash,完全是出于兴趣自学的业余爱好者。但是,由于教学的需要,偶尔需要动画制作,于是居然摸索着做了不少动画作品。所以,一旦喜欢上什么,潜力是无限的。

新教师是一个特殊群体,他们有热情和理想,却缺乏资源和经验。他们是一群可能会在复杂教育生态中受伤的群体,他们也是教育改革的希望。不知道出于何种原因,新教师可能会承担超负荷的期望和工作量,也许是因为他们脾气好,又或者是他们还缺乏话语权,再或者是给别人别人也不干,最后又只能给新教师。

当然,也有别的可能,比如领导信任或者新教师主动承担额外的工作,但无论是哪一种原因,这都不错一个好兆头。原因是它可能让新教师急于开展教学,而无暇思考教学。如果一名新手生物学教师一周的工作量超过15节,那么就会有问题了,如果超过20节,那么,问题会非常大。原因是新教师需要双倍或更多的时间备课,而且还需要参与培训和班主任工作。

为什么需要那么长的时间呢,因为他们缺少特定主题的教学资源和教学经验,缺乏学科教学知识,也就是把一个内容主题用何种方式能让学生达成更好的理解的知识,比如如何举例,开展何种活动,如何组织,如何评价,使用何种资源,如何使用,这些问题会消耗新手教师相当多的时间。很多老师因此只能疲于应付,结果是简单潦草的教学,失去了教学原本应有的从容和快乐。

如何解决这个问题,如何让新手教师真正的喜欢上教学、热爱教学、学会教学、善于教学,教学资源就是一个所有老师都关心和期待解决的问题。它不是简单的提供和获取资源,它好包括利用和完善资源、创造和交流资源。教学资源成为教师专业成长的关键一环。

sublime 支持正则表达式

1
#(#{1,})    #可以匹配##,###,####,#####等

更多可以参考廖雪峰的博客:https://www.liaoxuefeng.com/wiki/1252599548343744/1304066080636961

sublime 支持多文件搜索和替换

也就是你可以打开一个文件夹,然搜索该文件夹的所有文件中,是否有指定字符

sublime 支持在replace中使用捕获的字符

find:

1
my name is (\w+)

replace:

1
my name used to be $1

在比如,我想把博文中所以##,###,####后面都加上一个空格

find:

1
"#(#{1,})"

replace:

1
"#$1 "

为了让大家看到那个空格,我都加了””,实际使用时去除””。

常用的HEXO命令

1
2
3
4
5
hexo g #完整命令为hexo generate,用于生成静态文件
hexo s #完整命令为hexo server,用于启动服务器,主要用来本地预览
hexo d #完整命令为hexo deploy,用于将本地文件发布到github上
hexo n #完整命令为hexo new,用于新建一篇文章
hexo g -d #两个命令的合成,一般在修改或者添加博文后直接使用这个命令

pyenv是一个python环境版本管理器,当你有甚多项目,但是用的python版本不同时,为了让程序运行,你需要设定特点的py版本。这时pyenv就能发挥作用了。pyenv也能让你装多个py版本。

1
2
3
4
5
6
7
8
9
10
11
12
13
14
15
16
17
# 查看当前版本
pyenv version
# 查看所有版本
pyenv versions
# 查看所有可安装的版本
pyenv install --list
# 安装指定版本
pyenv install 3.6.5
# 安装新版本后rehash一下
pyenv rehash
# 删除指定版本
pyenv uninstall 3.5.2
# 指定全局版本
pyenv global 3.6.5
# 指定多个全局版本, 3版本优先
pyenv global 3.6.5 2.7.14
# 实际上当你切换版本后, 相应的pip和包仓库都是会自动切换过去的

virtualenv是一个虚拟环境管理器,当你的呈现需要不同的程序包版本支持的时候,而且它们往往还是相互排斥的,那么你就可以用它来解决,首先你创建一个虚拟环境,然后在这个环境下安装所需要的包,这样就可以运行相应的呈现了,前提是你需要先进入并激活对应的虚拟环境。

参考:这里

创建并进入虚拟环境

1
2
3
4
5
6
7
8
9
10
cd code/python_envs
# 方式1:
mkvirtualenv envname01 # 创建完毕会自动进入该虚拟环境
# 方式2:
virtualenv envname02
workon envname02 # 进入该虚拟环境
# 方式3:
virtualenv envname03
cd envname03
source bin/activate # 激活并进入虚拟环境

配置环境

1
2
3
pip3 install flask
pip3 install django
pip3 install Scipy

退出环境

1
deactivate

基于某Python环境创建虚拟环境:

1
2
mkvirtualenv -p python2.7 envname01
mkvirtualenv -p python3.6 envname02

常用命令:

1
2
3
4
5
6
7
8
9
10
mkvirtualenv envname02 #创建并进入虚拟环境
mkvirtualenv -p python3.6 envname02 #基于某Python3.6环境创建虚拟环境
workon #列出虚拟环境:
deactivate #退出虚拟环境
workon envname02 # 切换虚拟环境2
pip3 install 模块名 #为虚拟环境安装模块
pip3 uninstall 模块名 #为虚拟环境卸载模块
lssitepackages | pip list | pip3 list #查看虚拟环境里安装了哪些包
cpvirtualenv env1 env2 # 复制环境 前面的是原文件 后面的拷贝后的新文件
rmvirtualenv env2 #删除虚拟环境

用pyenv安装python3.6.14遇到的坑

最近升级了Big Sur mac系统,但是用pyenv安装python3.6.14失活不成功,运行:

1
CFLAGS="-I$(brew --prefix openssl)/include -I$(brew --prefix bzip2)/include -I$(brew --prefix readline)/include -I$(xcrun --show-sdk-path)/usr/include" LDFLAGS="-L$(brew --prefix openssl)/lib -L$(brew --prefix readline)/lib -L$(brew --prefix zlib)/lib -L$(brew --prefix bzip2)/lib" pyenv install --patch 3.6.14 < <(curl -sSL https://github.com/python/cpython/commit/8ea6353.patch\?full_index\=1)

提示如下:

1
2
3
4
5
6
7
8
9
10
-c ./Modules/pwdmodule.c -o Modules/pwdmodule.o
./Modules/posixmodule.c:8210:15: error: implicit declaration of function 'sendfile' is invalid in C99 [-Werror,-Wimplicit-function-declaration]
ret = sendfile(in, out, offset, &sbytes, &sf, flags);
^
./Modules/posixmodule.c:10432:5: warning: code will never be executed [-Wunreachable-code]
Py_FatalError("abort() called from Python code didn't abort!");
^~~~~~~~~~~~~
1 warning and 1 error generated.
make: *** [Modules/posixmodule.o] Error 1
make: *** Waiting for unfinished jobs....

后来,参考了这篇,运行了下面的代码:(功能是在bash_profile里添加环境判断):

1
2
echo -e 'if command -v pyenv 1>/dev/null 2>&1; then\n  eval "$(pyenv init -)"\nfi' >> ~/.bash_profile #添加环境判断
source ~/.bash_profile #更新配置文件

最终才成功安装,这个坑很深。

在线教学在疫情期间成为唯一教学选择,那么教师真实的教学体验如何?通过问卷我们收集到了一些老师的回答,量化数据分析还好说,但是对于老师们的文字反馈,确实让人头疼。

如果严格的分析,需要使用质性分析的方法,通过逐句逐句阅读和编码,形成初步的一级编码,然后对一级编辑进行概括和联系形成二级编码,最后识别主要的theme,进而对问题形成解释模型。但是,时间关系我根本来不及做这样的分析,我只想得到一个大体的结果,形成一个具有概括性的图示来揭示问题。

于是我首先对每个回答进行的标签标记,再经过3个半天的工作后,终于完成了对1000多条反馈的初步标记。最终形成18个重要的类别,不同的教师反馈的标签组合也不同。我最终获得的数据就是1000X18的一个数据表,某个标签出现标记为1,否则0。标签工作是做完了,但是我总不能把这么大的一个表展示给同行吧,于是任务的关键变成了如何将这个数据表可视化。于是我想到了python。我在做博士论文数据可视化的时候就用过,但是还是zoom quite帮我编的程序,这次又需要它救场了。

首先我查了一下python可视化的方法,很多,比较常用的法案是matplotlib+pandas+networkx,其中pandas对接数据,networkx对接网图,matplot对接制图。

可视化的关键是找到绘图思路,我的思路就是如果哪些关键词同时出现,那么这些关键词之间就存在联系,如果同时出现的频率越高,联系也就越紧,所以我想用数据绘制一个关键词网络,进而反应关键词之间的关系和主体划分。

下面我解释一下代码实现过程,下面就是完整的代码:

1
2
#!/usr/bin/python
# -*- coding: UTF-8 -*-

声明编码类型,这里选择UTF-8是为了兼容中英文。

1
2
3
4
5
# libraries
import pandas as pd
import numpy as np
import networkx as nx
import matplotlib.pyplot as plt

导入相应的库,python就一个优点,库多,没有找不到的,只有你想不到的,扩张了:)。

1
2
df = pd.read_csv('map.csv')
#print df[1]

使用pd阅读csv文件,确保文件与程序文件在相同目录。

1
df=df.fillna(np.random.rand()*0.1)

填充缺省值,数据表中很多数据缺失,这里使用了一个小于0.1的随机数进行替换。

1
print(df.loc[0,:])

检测一下数据是否成功获取

1
2
3
4
5
6
# Calculate the correlation between individuals. We have to transpose first, because the corr function calculate the pairwise correlations between columns.
corr = df.corr()

# Transform it in a links data frame (3 columns only):
links = corr.stack().reset_index()
links.columns = ['var1', 'var2', 'value']

计算相关系数,并把计算结果储存在links中

1
2
# Keep only correlation over a threshold and remove self correlation (cor(A,A)=1)
links_filtered=links.loc[ (links['value'] > 0.1) & (links['var1'] != links['var2']) ]

筛选相关系数大于特点临界值的关联。

1
2
3
4
# Build your graph
G=nx.from_pandas_edgelist(links_filtered, 'var1', 'var2')
# Plot the network:
nx.draw(G, with_labels=True, node_color='orange', node_size=400, edge_color='black', linewidths=1, font_size=10)

基于links_filtered,利用nx构建和绘制网图

1
plt.show()

如果你的图没显示出来,上面的命令就是把绘制好的图展示出来。

新房子要装修,定制的柜子今天到了,老婆让我去接货,说师傅在外面等着呢。我刚把二宝哄睡,哄睡的方式十分奇葩,孩子吃完午饭,把她放在小车里,在小区里推一圈,推到一半孩子就睡着了。坐在睡着的,头歪在肩膀上,弯成九十度。即便是在搬砖铺砌的小路上颠簸,也没把她颠醒,可见是真困了。跟我一样,午饭后特别犯困。有人曾经一度以为这是一种病,其实就是血液都跑到肠道去了,大脑缺血导致的犯困。

接到催促的电话,我并没有马上行动,因为我发现孩子大臂内侧肿了一个长条形的大包。可能是推她遛弯的时候,不小心被蚊子咬了。我让自己保持镇定,赶紧去厨房找来大蒜,去皮然后用指甲扣掉一部分,反复刮大蒜瓣上的切口,搞出一点大蒜汁液抹在大包上。一般蚊子叮咬之后,越快抹上越有效果。等弄完了一切,我才找到车钥匙赶紧去给师傅开门。

等我到的时候,看到一辆大货车,但是并没看到人。我起着电瓶车就往楼门口骑,在楼房前面,迎面走来一位满脸汗水的汉子,他的个子并不高,但是上身很宽、很结实。我问他是不是往18楼送货,他说:是的,一卡车,有98包。这时保安骑着巡逻车跟了上了,说这里不能停车。我问他可以停哪,他说停到哪边的停车点。我说好的。汉子让我去看已经搬下车并放在楼外面的包裹。这些包裹都是用纸壳箱打包而成的,里面还裹着一层塑料泡沫,主要是防止里面的板材被刮伤。他指了指靠在墙上的2人多高长条形包裹,又指了指靠在另一边又长又宽的包裹,这个包裹用木头订了框架进行保护,他说估计这两个没办法弄上去,因为进不了电梯。我刚想回话,这时保安已经下了巡逻车,催促我不能停车,汉子这时帮腔道:他也没想停这里。我歉意的向汉子挥了挥手,我说等我一下,我先停一下车。于是停了车才回来研究如何把其中的超长和超宽包裹搞上去。汉子说如果能进电梯,我肯定能帮你都送进屋里,但是这2个估计困难,我不可能背着上18楼。我说我也没有办法。并埋怨到发货的也不动动脑子,这样的包裹能好进屋吗。如果不能进屋有两个办法,一个是走楼梯,18楼真实让人望而却步。另外一个办法是用绳子拽上去,但是根本没有这样的绳子和滑轮。于是我说:我也没办法,要不先搬能搬的吧。

于是,我开了门,就在屋里等着师傅把包裹送上了,等了10分钟,估计师傅基本已经把货都卸下来了,才看到师傅用小推车把六七个包裹送上了,我让他放在事先用纸壳铺好的客厅。纸壳是我用了100元在废品回收站买的,这样可以放在弄坏地板。于是我开始数包裹的数量,师傅开始往上搬。中间师傅接了一个电话,我听口音是四川话,就问他是不是四川人,他说是的。他让我计数,因为最后要拍照发给公司。中间他好说起自己曾经装过门窗,搞过装修,他说这个客厅移门可以拆掉,我就说你要不要,要的话,你就拉走好了。他说我可以找小区收废品的,不要钱他们会帮忙运走。大概花了2个小时,师傅终于把能进电梯的都搬上来了。中间我也下去帮忙了几次,主要是挡住电梯门和帮忙调整角度,都不是什么累活。在师傅搬货的过程中,我也打电话向老婆报告了情况,让她联系厂家看是否有办法。搬了一半的时候,刚好老婆和儿子参加完疯狂猫儿童表演活动回来。看到了最后三个无法进电梯的包裹,就跟厂家联系,最后只好把包裹拆开,看里面的货物是否可以一件一件拿上去。老婆看了客厅里的包裹后,十分吃惊,这都是师傅一个人搬上来的。加在一起,大概有一顿多重。她说应可把板子锯断也不能让师傅背了。她让我赶紧去送孩子去打网球,因为5点半的网球课马上开始了。我驮上孩子去出租屋取球拍,顺便我还带上了锯子,准备把特别长的板子锯断。中间我发了一条短信,我说如果师傅要走楼梯的话,就让他背那块板子,另外两个比较轻的我们可以自己拿上18楼。等我送完孩子,回来之后发现板子以及不见了,原来是他们把包裹拆了之后,放进电梯里弄上去了。最后剩下的两条长板子实在是太长不能放进电梯只能走楼梯,但是我们也没让师傅拿,而是我和老婆自己扛上18楼的,幸好并不重。只是每次转弯处都十分困难,想走快也走不快,只能慢慢爬楼,经过10分钟左右,我们两个重要把最后3块板子弄上了楼。

我刚送完孩子的时候,回来看到老婆正在和师傅谈话,因为离的比较远也不知道他们再聊什么。后来,老婆吃完饭的时候说,师傅太累了,她当时还劝师傅换一个工作。我补充到这个钱可不是那么好赚的。我妈说每个人都有自己的工作,他不干还是会有别人干。

回来上楼的时候,我遇到了一个男人和一个男孩,以为他们是父子,他们也到18楼。电梯里我就看这个男人十分熟悉,但是就是想不起来。后来还是老婆在楼下认出来了,他是孩子以前的钢琴启蒙老师赵老师。他就住我们隔壁,老婆问以后是否可以跟赵老师学钢琴。赵老师说他现在教的是基础比较好的,跟着他上楼的就是他的学生。我心想还是搞艺术的人挣钱容易呀。

中国有一群特别的年轻人,他们干劲十足,他们也有同情心,他们都是80后,他们心里也有不平衡,但更多的是拼搏,无论是自觉还是不自觉。他们有不同的社会分工,他们有很大的差异,但是相同的是他们都在牺牲着某些东西,进而追赶社会发展的车轮。而这些牺牲,可能是身体,可能是健康,可能是时间,可能是自由,他们换取的却主要是金钱,不知道他们老了之后,是否会后悔这样的选择。至少在我父亲(50后)弯曲的右手和蹒跚的双腿上,我从内心并不认同这种交换。但奇怪的是我们都被裹挟着、忙碌着、交换着,好像是自愿的,但却也可能是无意识的。我不禁要问:这真是我们最好的选择吗?这真是我们期待的时代吗?我们是不是都丢了什么?

0%